
Windows has a rather patchy history when it comes to native photo viewing and editing, but the latest Photos app is quietly becoming genuinely useful. It may not be a full-blown Photoshop alternative, but it does now offer a variety of basic editing functions, and even some generative AI to help get your images looking their best.
Photos combines a photo viewer and a photo editor, so the first job it takes on when you load it up is cataloging all the pictures you’ve got on your system. Use the gear icon at the top to change the configuration of this photo viewer, and the buttons just above the images to alter the order that pictures are shown in.
When you’re ready to start editing, double-click on any image in your library. This brings up a larger view, with links to OneDrive and Microsoft Designer, but we’re interested in the built-in editing tools—click the Edit button (on the top left).

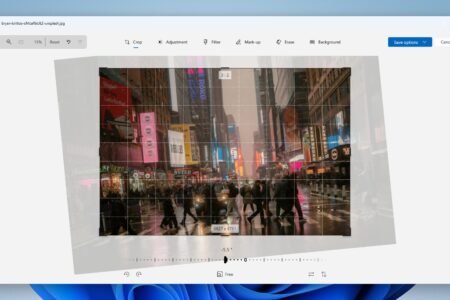
You can crop and rotate images with a few clicks.
Credit: Lifehacker
The screen you’ll see first is for cropping and rotating. Click and drag the handles at the corner of the selected picture to change how it’s cropped (hold down Shift to maintain the aspect ratio), or click and drag along the degrees slider to alter the angle. You’ve got buttons along the bottom for 90-degree rotations, horizontal and vertical flips, and specific aspect ratio crops (like 4:3 or 16:9).
At any point during your editing, you can click the undo button (the backwards arrow, top left) to go back a step, or the Reset button to go all the way back to the beginning—a reassuring safety net if you’re worried about ruining a favorite photo. Your save options, meanwhile, are up in the top right: You can overwrite the existing image, save a new image, or copy the image to the clipboard.
The icons along the top (which come with text labels, if the app window is big enough) will guide you to the other parts of the program: You’ve got Crop, Adjustment, Filter, Mark-up, Erase, and Background. Any changes you make on one panel will be kept as you move to other panels, but aren’t committed to disk until you save the file.
Switch to the Adjustment screen and you’ll see a familiar row of sliders, covering attributes like Brightness, Exposure, and Contrast—make changes to any of these sliders and the results are shown straight away. For example, increase the Shadows value to see more detail in the dark areas of an image, or lower the Highlights value to get more clarity in the brighter areas.
You’ve also got color-related sliders, so you’re able to adjust the image Saturation, Warmth, Tint, and Sharpness too. For more precise control on any of these sliders, click the slider you want to adjust, then use the arrow keys on the keyboard (either left and right or up and down) to change the values.
What do you think so far?
